7. Animations
Animations are a nice feature of ParaView that is inherited also in AthosGEO View. Many of the properties of the filters in the pipeline can be animated.
An animation like the above is specified in the Animation View panel as shown in Fig. 7.18. That panel can be shown or hidden from the View menu.
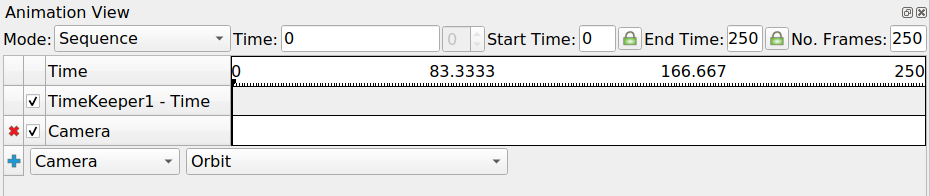
Fig. 7.18 The parameters of an animation are specified in the Animation View panel.
Run the animation with the animation toolbar buttons  .
.
7.1. Steps
The following steps will generate an animation where a clip plane moves through a block model, so a viewer will get a short glimpse of the internals of the model within about 10 seconds.
As a first step, the Animation View panel is shown from the View menu, by default at the bottom of the views.
Open a block model and add a Clip filter.
In the Properties panel, our property of interest is the Offset. Finding the minimum and maximum values of interest for the animation is a question of trial and error.
In the Animation View, select Clip1 and Clip Type - Offset from the combo boxes at the bottom. Press the + button to add the offset to the animation parameters.
Double-click on the new Clip1 - Clip Type - Offset button to open a dialog that allows to specify the value range for the offset within the animation, as shown in Fig. 7.20.
Use the animation toolbar
From the File menu, the Save Animation command is able to directly write the animation into a video file.
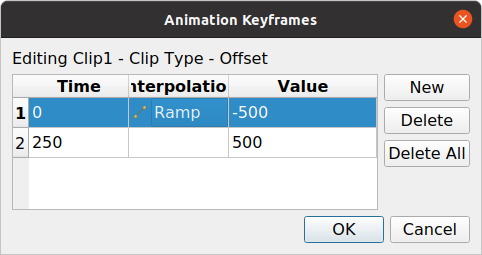
Fig. 7.20 The value range of interest for an animation can be specified in this dialog.
The resulting animation video file can be embedded in presentations and documentations like here in this manual.
These steps must be good enough now for a user to get started with animations.
7.1.1. Loading an animation from files: Numbered sequences of files
A numbered sequence of files would be something like::
file01.csv
file02.csv
file03.csv
In the Open file dialog of AthosGEO View, this group would appear as such as shown in Fig. 7.22.

Fig. 7.22 In an Open file dialog, a numbered group of files will appear like this and can be selected as a whole.
File types canot only be CSV, but also all other file types that are known to AthosGEO View, like VTU, VTD and many others.
Once a file group is loaded, it will be shown in the related viewer, like a Table View or a Render View, once the user has pressed Apply.
At this moment, the tools of the animation tool bar are available to run step by step through the loaded files. What this means depends on the viewer:
A Render View will visualize geometric objects one after the other
A Table View will simply go through the different table data
7.1.2. Attaching filters to animations
Many filters can be attached to an animation. Once the animation is run, they will be applied to the different files one after the other, generating a resulting animation.
7.1.3. Saving animation data to files: Extractors
Animations cannot only be displayed, but also written to disk files. This can be the output of a filter that generates an animation by it’s own, or it is the output of a filter that takes an animation as input, generating an animation also as output.
It is now possible to attach an Extractor to such an output port, and there are different extractors available, according to the generated data type: CSV, VTU, VTD or others.
One of the properties that have to be specified is an output filename, as shown in Fig. 7.23. The default default filename can be overwritten, but make sure to keep a {timestep:…} section: The output will not be a single file, but a numbered sequence of files, and the number will be generated at the location of this section!

Fig. 7.23 The Properties of a CSV Extractors include a filename which needs to include a {timestep:…} section, with some format indicator: If this is 06d for examples, it will be numbers in a 6 digit field, filled with zeroes like filename000001.csv, filename000002.csv etc.
Saving the file sequence will be initialized with the Save Extracts
tool button  .
.
The user will be asked to choose a folder for the output files, then the animation will be run automatically, writing the output to the files as desired.
One way to further process such numbered file sequences is to load and visualize them as an animation, as described above.